Tuesday, November 8, 2016

[WIP] HG Shia Qan[T] WIP 1


So I saw this kit, the HGBF Gundam OO Shia Qan[T], in one of the toy stores and those clear parts just kept calling to me. And since it was on sale, I decided to get one and try to light it up.

I don't plan on painting this kit, maybe just a flat coat afterwards, since I'm considering this as a minor project since I kind of feel exhausted with the ones I'm currently working on.(actually I'm just tired of thinking how to wire those kits... :P)

I started working on various pieces. I don't plan on finishing any specific section first. Just trying to wire up all pieces first.

One of the first pieces I worked on was the leg areas. I initially thought it would be easy and straightforward since there was plenty of space inside the lower legs but I found out there wasn't really any place behind the clear part to place the LED. 1.) The area behind the clear piece is occupied by the knee joint so there's no way I can place the LED there without sacrificing the knee articulation. 2.) I didn't want to place the LED directly behind the clear piece because aside from poorly lighting up the big clear piece, it would also create a bright dot that doesn't look well with the effect I wanted.


Instead of directly behind the clear piece, what I did was drill a hole, the same size as the LED, on the edge of the area covered by the clear piece. In this case, it's the edge of the foil sticker.


The effect was way better than I expected. Though I'm not sure why it appears that the foil sticker isn't reflecting any light towards the clear piece.


And since I'm already working on the leg area, I decided to finish working on the legs and work on wiring through the knee joints. The knee joint has a unique construction and luckily, there was enough room to pass through the wires

One of the tricky parts of this kit was the arm areas since there are 2 areas that need to be lit up and that there wasn't much space inside to work with. What made it much harder was that one of the clear pieces is on the joint itself.


Same with the leg piece, I placed the LED on the edge of the clear part so it light up from the edges.


This shot was taken with the low brightness setting to simulate how the piece would actually look like in personal. I guess it can't be helped with the bright spots where the LED is.


I've also finished working on the GN Sword. For this I used a 3mm LED filed ti fit inside the part.


Here's a shot of the rear skirt piece. I'm really liking the effect it gives on the blueparts. I'm only using white LED.

Next thing I worked on was the GN binder. This I think will be the hardest section of this kit.


Wiring the individual sections of the GN binder wasn't really hard. I just have to plan accordingly where the wires would be coming from to help prepare when putting them all together.


The GN sword bits would have to be the hardest part to light up. There are too many tiny pieces packed together. I may have found a way to light it up but I ended up having too much wires coming out of the part. I'll have to plan how to manage those wirings.


Since it appears that I'm done working on the lower body of the kit, I decided to assemble it for now to see how it would look like. And I'm really liking the effect on the blue parts. Hope it continues to look good throughout the project.

[WIP] Magic Toys MG Hazel Custom x LED WIP 4

Wow. It actually took this long for an update to this.

Well, I've actually finished this for quite some time now it's just that I haven't got the time to take pics of the finished kit.

Continuing where I left off last time, I've finished applying decals to this kit.


I decided to finish the decals and panel lining first before putting it all together so that it would still be easier to reach the other areas of the kit.


After detailing the kit, I proceed to putting everything together All wires go into the waist area. And to make connections easier, I separate the wires based on polarity, Positive wires on one side, and negative wires on the other.


I couldn't remember what I did but the hip joint of my kit got a bit too loose. Now I'm having problems making this kit stand up, let alone have any dynamic poses, specially when the shield booster is attached at the backpack. The legs can still separate at the joints so I may try to fix that one of these days.

Friday, November 4, 2016

[REVIEW] Anubis Multi Function Base


I recently got my hands on this cool looking action base called the Anubis Multi Function Base. So I'm sharing with you guys this sort of unboxing/review.


Unlike the regular action bases that we usually see, this comes in a box. The box feels thick and solid. And most of the text is in chinese(I think). 


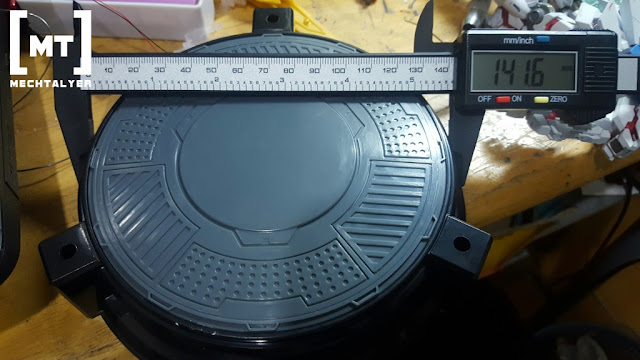
The primary reason why I got this was because of the raised base. I measured the base and it's roughly 33 mm or 1.2 inches. My caliper wasn't able to fully measure the diameter of the base. The base's body measures about 141.6 mm or 5.5 inches. there is some extra lip at the bottom part so maybe that's where it got the 7 inch label in the box.


We get 2 base plates. 1 detailed and 1 plain.


And felt sticker. Maybe for the plain base plate.


We also got 3 identical runners. These are for the sub arms.


There's quite a screws to be used for the sub arms.


The manual is just 1 piece printed on both sides. Luckily the instructions and images are clearly displayed since the part numbering in the manual and in the runners are not the same. Though you can follow the instructions since you should be able to determine which part was used based on the pics in the manual.


Assembling the pieces, you get 3 of these sub arms.


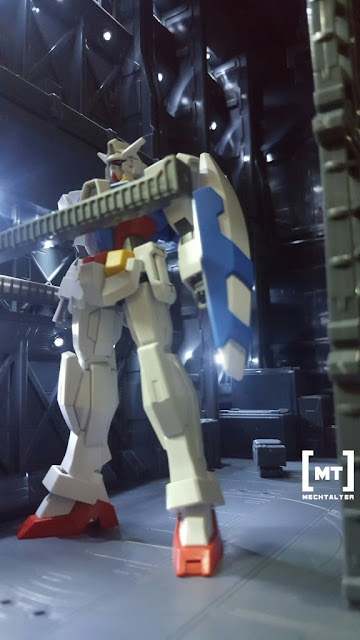
Here's a pic with the 1/144 FG Age 1 Normal gunpla.


After doing some research, I found that they also released versions for the Unicorn Gundam. Sinanju, and the Gaia gundam

Wednesday, November 2, 2016

[WIP] Mechanical Chain Base LED custom WIP 4

Finally done some wiring on this. 


I forgot to take pics of the back side but same as what I showed before, the LEDs are connected in parallel connection. I like the effect the light gives on the wall's details specially on the left side. the right wide wall has that bar that blocks the light which makes the wall darker.


Here's some test shots using a 1/144 AG Age 1 Normal Gundam kit. The chain base's accessories appear to be in 1/144 scale. So far I'm very satisfied with the result of the light in the wall.


I've also wired the ceiling with LEDs. I'm olny using 2 plates for the ceiling so that I could also use natural light and not make the base look too dark. I connected those LEDs in parallel and put a connector near the adjacent wall so the LED in the ceiling will also be connected to the LEDs in the walls.


Here's some test shots of what's already been done. I'm still researching how to light up the other adjacent wall. Also I'm planning on doing some detail lighting in a few areas using fiber optics when my drill bits arrive. Plus I still have to do a bit of dry brushing to better display the details.

Welcome

Welcome to MechTalyer. My personal space for everything Gunpla.

Search

Popular Posts

Followers

Categories

1/100 (5) 100 (7) 144 (10) 2017 (4) air compressor (2) airbrush (6) amazing red warrior (2) anubis (1) avalanche (1) bandai (9) barbatos (1) base (5) blog (1) bsc (1) community (2) completed (1) conversion (2) custom (18) daban (3) decals (1) destiny (1) display (7) dragon momoko (10) event (1) exia (4) expo (2) flying base r (1) geirail (1) GMKC (2) guide (1) gundam (21) gunpla (24) gunpla builders den (2) haro (1) hazel custom (1) hg (8) hobby (11) IBO (1) jesta cannon (1) kamil (30) kotobukiya (1) led (38) led unit (1) magic toys (1) master grade (11) meetup (1) metal build (5) MG (25) mod (25) monoeye (1) nu (4) others (2) paint (7) pearl gloss (1) peg (1) phenex (4) philippines (4) qan[t] (2) random (7) review (15) RG (6) rx78 (2) setup (1) shia (2) sinanju (1) site (1) star build strike (2) stickers (1) strike freedom (8) tthongli (2) tutorial (6) unicorn (5) upgrade (1) vintage (2) wing expansion effect (1) wing zero custom (1) wip (36) zaku (2) zaku 2 (3)

Statistics

Powered by Blogger.