Showing posts with label hg. Show all posts
Thursday, August 10, 2017
Finally had some time for a new post. Here's another sort of tutorial/ guide on how to add LEDs on heads of HG kits. This time, it's the HG Geirail from the Iron Blooded Orphans anime.
Drill a hole on the "main" head frame. This is where I will be attaching the LED. Though the actual sensor of the MS is rectangular, I decided to go with just a small hole for simplicity and since there is still a piece that will diffuse the light.
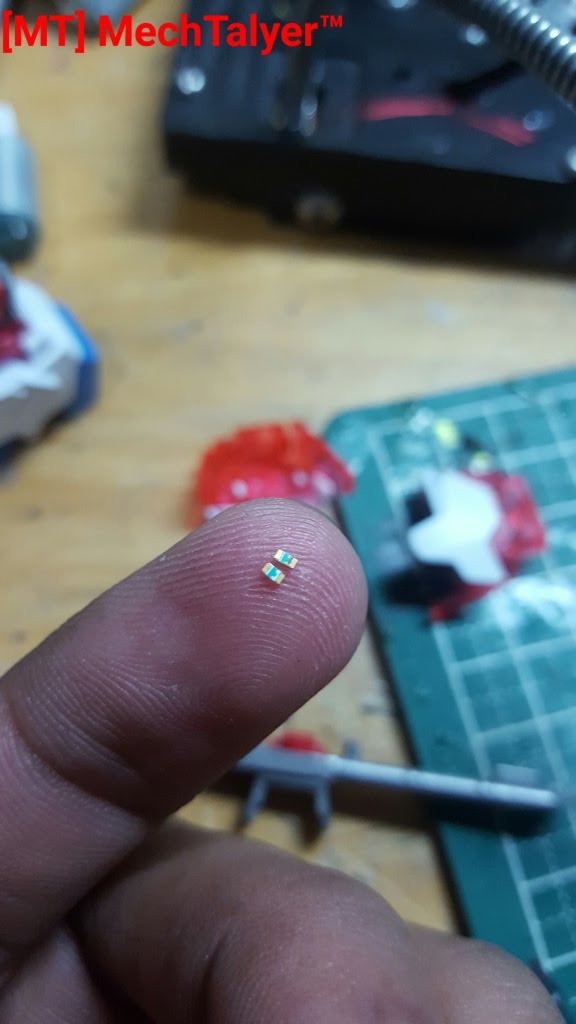
For this I will be using white 0603 SMD LEDs, wires are 30AWG wires. Total radius of the wires will be 1mm. So I need a 1mm or bigger drill bit. I decided to use 1.2mm to give it a bit of clearance and so the wires don't get stuck in the holes. I mostly get them online since these stuff isn't available locally here where I live.
Once the part is drilled, its time to glue the LED in place.
Next we plan on how the wires will exit the head, towards the body. There's actually plenty of space in the HG Geirail for this.
Testing the LED after putting the head together. It's good practice to test if the LED after putting together a section of the kit. It would suck so bad if you just find out that the LED or wiring broke after putting the whole kit together.
Next would be passing the wires through the body, luckily, plenty of space here.
I decided to stop here, below the body since I still don't have a specific plan for this kit. I can continue passing the wires through to the feet to hide wires while standing display or anywhere where it will not be noticeable.
The red clear piece diffused the light really well giving a cool effect.
Monday, December 5, 2016
Thursday, December 1, 2016
[WIP] RG Amazing Red Warrior WIP 4
Author: kamilamoroso |
Thursday, December 1, 2016 at 2:00 PM |
No comments |
It's been quite a while since I worked on this kit. Primarily because I haven't got the time and skill to start painting my kits. But thanks to the previous long weekend, I finally had the chance to setup my airbrush set and start painting this.
I first primed the parts using an industrial grade primer in a spray can.
I'm using a DIY airbrush set. You can see I have multiple pumps connected together just so I can get the pressure I needed. This setup actually ended being more expensive than just buying a hobby grade air pump. But I don't want to waste any more money so I'm making the most out of this.
I'm using polyurethane paints, commonly used in automobiles. I got this from a paint shop where the owner is also a plamo builder.
I've managed to paint most of the kit during the weekend.Though there a few rough spots and some paint inconsistencies, I'm really satisfied with what I achieved here.
Monday, October 31, 2016
[WIP] HG Unicorn Gundam (Unicorn Mode) WIP 3
Author: kamilamoroso |
Monday, October 31, 2016 at 12:44 PM |
No comments |
It's been 10 months since I last worked on this. I've put this project on hold for quite a few reasons.
1.) This project required some painting to deal with the light bleeding and to make the kit look better.
2.) I didn't have the right size of LED I wanted to use.
3.) I haven't worked out a plan how to pace and wire the LED.
Obviously, there has been some improvements with this project hence the update.
After working on so many other kits, I think I've thought of a way how to light the kit.
For the head part, I'm using 0603 SMD LEDs. These are white LEDs and I just painted them with clear paints to get the color I need. Here I used Tamiya clear green. The number of coats depend on how intense the required color.
The chest part was one of the easiest part to do since it just needed minimal cutting to make space inside. I used 3528 SMD LED here because the I need to light up a big bit of seam here. The consequence here would be the ugly light bleeding which would be fixed by painting.
Next thing I worked on would be one of the hardest parts of the project, the legs. I had to do multiple trials to get the appropriate LED positions to get the lighting I wanted.
So far the pieces look a bit dirty due to the black paints I put on the insides to deal with the light bleeding. This will still be cleaned up and painted. Hopefully by the next blog update I've finished wiring the whole kit so this project can proceed to the painting phase. I'm still unable to do paint sessions due to busy work-life stuff so I might have to commission the painting for this.
[WIP] HG Unicorn Gundam [Destroy Mode] WIP 4
Author: kamilamoroso |
at 11:38 AM |
No comments |
We're down to the home stretch with this project.
Now that all sections of the kit has been wired, it's now time to put everything together.
I started first with the upper body. At this point, it's important to make sure there is enough wire allowance for the articulation. As usual I'm wiring everything in parallel. Combine all the positive wires together same as with the negative wires. Once that's done, I'll have just one pair of wires going out the abdomen area that will be used to connect the upper and lower bodies together.
Unfortunately I wasn't able to take pics during wiring of the lower body. But it's just the same principle with the upper body, Just combine all the positive wires together, same as with the negative wires.
Since I'm using the smaller 0603 SMD LEDs, there isn't much light in the clear pieces but still enough to spread light evenly. I've also put connectors on 3 locations, 1 on each foot and another underneath the crotch area near the action base connector. That way I have options how to hide the connection to the power supply depending on the way I want to display it.
Now I just need to do a proper photo shoot of this. same as with my other completed projects.
Friday, October 28, 2016
[WIP] HG Unicorn Gundam [Destroy Mode] WIP 3
Author: kamilamoroso |
Friday, October 28, 2016 at 4:48 PM |
No comments |
We're nearing the home stretch.
Continuing where I left off in the upper body, I proceed on working the chest area. Using the 0603 SMD LEDs were really helpful that now I can place LEDs in areas I was previously unable to. Now, lighting kits specially in 1/144 scale need less modding to fit the LEDs. Less mods means less plastic removed which equals more sturdy parts specially in the joints.
For the chest area, I used the back to back LEDs so that I could light up more areas of the chest pieces. Again, due to the size of the LEDs, aside from drilling the holes for passing the wires, no mods have been done on the parts. Previously I had to cut off as much plastic inside the chest to allow the LED to light as much area of the clear piece.
The shoulders were also quick and easy, I just glued an LED underneath the clear pieces.
And that completes the pieces for the upper body.
For the waist area, the peg holes originally for the clear piece fits the LEDs quite nicely.
The front skirt area actually took a good amount of time during planning since it was a fairly large piece to be lit by a small LED. Though there were plenty of space behind the piece, the problem was finding the right position for the LED to light the whole piece.
The crotch piece was fairly easy. I just glued the LED onto the frame part and ran the wires on opposite ends. This will be the start of me segregating the wires per polarity. Separating the wires on each side makes managing the wires easier.
Finishing the legs required the most amount of work. Each leg used 9 LEDs from upper leg down to the feet. There was also limited spaces inside that made managing the wiring more challenging.
There was just enough space to manage the wiring in the lower leg. good thing I was using very thin wires.
Passing the wires through the knee joints also challenging. I need to be able to pass the wires through the joint without sacrificing articulation and without putting too much strain on the wires that could damage them.
Last part was the upper leg area. this required 2 LEDs since I needed to light up 360 degrees of the part. Here it can be seen that I used 2 types of LEDs, a 0603 LED and a 3528 LED. The 0805 was used to light up the separate smaller clear piece while the 3528 LED was used to light up the other 3 sides.
Good thing I didn't get any issues putting the leg together, no parts were damaged beyond what was already there, articulation is still good and light looks good. It only appears too bright in the pictures but it's dimmer and more balanced in actual.
Now it''s time to put it all together..
Tuesday, October 25, 2016
[WIP] HG Unicorn Gundam [Destroy Mode] WIP 2
Author: kamilamoroso |
Tuesday, October 25, 2016 at 2:55 PM |
No comments |
Here's another summary of what I've done up to now.
This has got to be one of the easiest part of this project. I just glued the LED onto the part. To add strength to the connection, I drilled a hole through the peg and pass the wire there.
Continuing on the feet, I've also put LEDs on the ankle areas. This was a bit tricky because this required me to light up 360 degrees of the part while using minimum amount of LEDs.
To fix this, I soldered 2 LEDs back to back. Taking note of the polarity, positives soldered together, same as with the negative side.
Then it was just a matter of running the wires around the ankle joint and exiting towards the upper portions of the kit.
Next thing I worked on was the shields.
It was just a matter gluing the LEDs on the corners of the psychoframe where it is out of view. Then running the wires around the arm connector. I drilled a hole in the arm armor and frame to run the wires through.
Same with the ankle area. The arms need to be lit 360 degrees so I used the back to back LEDs to light the arm parts.
The lights appear to be a bit spotty or concentrated in some areas but they do look better in actual.
Welcome
Welcome to MechTalyer. My personal space for everything Gunpla.
Search
Popular Posts
-
To start off this new year, let's take a look at one of the most awaited bootleg kits since it's announcement around 2 months ago. ...
-
Since I'm well on my way on finishing most of my projects, I decided to get back on the MG scene starting with this latest kit from Dab...
-
I've been holding out from buying new kits lately until I finish most of my projects. And It's been really hard since the kits bein...
-
With the Daban and Dragon Momoko(DM) MG Strike Freedom kits being released almost at the same time, one of the most noticeable differences ...
-
I just finished building most of this kit. So here's a bit of mini review for this. I'll just talk about my build experience with t...
-
NOTE: You may or may not need this review in the future. ;P Anyway, here's an unboxing review of the Dragon Momoko MG Exia(+Repair ve...
Followers
Categories
1/100
(5)
100
(7)
144
(10)
2017
(4)
air compressor
(2)
airbrush
(6)
amazing red warrior
(2)
anubis
(1)
avalanche
(1)
bandai
(9)
barbatos
(1)
base
(5)
blog
(1)
bsc
(1)
community
(2)
completed
(1)
conversion
(2)
custom
(18)
daban
(3)
decals
(1)
destiny
(1)
display
(7)
dragon momoko
(10)
event
(1)
exia
(4)
expo
(2)
flying base r
(1)
geirail
(1)
GMKC
(2)
guide
(1)
gundam
(21)
gunpla
(24)
gunpla builders den
(2)
haro
(1)
hazel custom
(1)
hg
(8)
hobby
(11)
IBO
(1)
jesta cannon
(1)
kamil
(30)
kotobukiya
(1)
led
(38)
led unit
(1)
magic toys
(1)
master grade
(11)
meetup
(1)
metal build
(5)
MG
(25)
mod
(25)
monoeye
(1)
nu
(4)
others
(2)
paint
(7)
pearl gloss
(1)
peg
(1)
phenex
(4)
philippines
(4)
qan[t]
(2)
random
(7)
review
(15)
RG
(6)
rx78
(2)
setup
(1)
shia
(2)
sinanju
(1)
site
(1)
star build strike
(2)
stickers
(1)
strike freedom
(8)
tthongli
(2)
tutorial
(6)
unicorn
(5)
upgrade
(1)
vintage
(2)
wing expansion effect
(1)
wing zero custom
(1)
wip
(36)
zaku
(2)
zaku 2
(3)
Archives
Statistics
Powered by Blogger.