Tuesday, November 29, 2016

[REVIEW] Kotobukiya Flying Base R

Here's a little review of the Kotobukiya Flying Base R I got over the weekend.


The kit is packaged neatly in a small plastic bag similar to other MSG goods Kotobukiya has. 


The base is a bit small, a little smaller than the Action Base 1 but a lot bigger than the Action Base 2. Parts are packaged neatly in their own sections in the plastic. Also notable are the pre-built stands. Though the connectors are still in their runners.


I say this base is most suitable for 1/144 scale Gunpla, as seen here with an AG Age 1 Normal Gundam

[WIP] MG Phenex WIP 3

I really had a lot to be thankful for this weekend. One of which is the amount of stuff I was able to do in regards of the ongoing projects.

Back to the MG Phenex, I worked on the other parts of the body that haven't been wired yet.


Lighting the backpack was pretty straightforward. No excessive modding was done to accommodate the wiring. I just made sure that I connect all the necessary wires together inside the backpack so I only have 1 pair of wire going out of the part.


The shoulders were a little easy too thanks to the size of the SMD LED. The LEDs fit well in the gaps between the armor and frame pieces. I'm not sure why but the shoulder armor tends to not fully close. I've also experienced this with my MG Banshee Titanium finish.


I've decided to combine the wires here in the shoulders so that the number of wires going into the body would be decreased. 


I think the chest required the most number of LEDs since it is covered by clear pieces all around. Here you can see the amount of wires coming out of the chest. Let alone the other parts that will be connected here. 


Combining the wires in the waist area was really stressful since I had to pass the wires around the pieces in certain ways so that the pieces would close properly. After successfully passing the wires through the waist area, it's now time to combine them. Part of passing the wires through the waist part also required that they go in each side depending on their polarity. Keeping each polarity on either side makes makes the assembly harder but makes combining the wires easier,


Combining the upper and lower halves through the stomach area was the easiest solution instead of in the waist area which would require that I pass through the upper sections wires through the complicated waist area. 


It's finally taking shape. Unfortunately, with all the LEDs connected, it appears that the LEDs are now under powered since there are some parts that appear to be lit poorly. Hopefully a better power supply, like a power bank, fixes this issue.


I believe this is a common issue with the MG Unicorn Design. The waist area is loose and the only thing holding it together is a locking tab at the back. But the tab itself tends to get loose quite easily. I'm still thinking of a way to secure this connection.


I've also started working on the Armed Armor DEs. Though I still have to rewire some areas since it's not well lit specially the bottom area as seen from the pic above.

[WIP] Petit'gguy LED Mod WIP 1

Working on the MG Phenex was really starting to stress me out. So I decided to a little side project to release some stress.


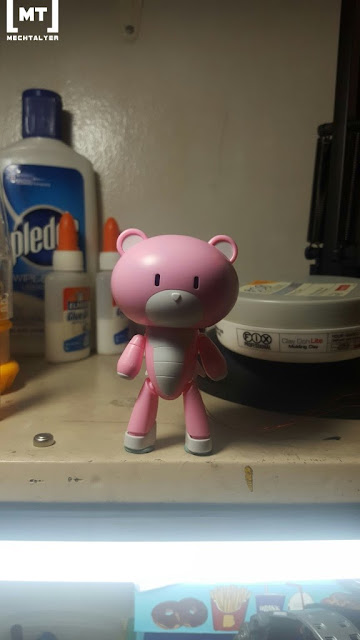
I've had this Petit'gguy for quite some time now but didn't know what to do in terms of lighting it up. I originally wanted to just light the eyes up but I think it would look creepy specially in the night.

So in line with the cute theme of this kit, I wanted to make it either blush or glow in the heart. For the Petit'gguy, I think the blush effect would be easier to do since that big head makes a lot of room.


First thing I did was paint the insides of the part black. This is to prevent light bleeding. I had to apply multiple coats to make sure no amount of light will show. 

Once the insides have been painted, it's now time to clean off the areas where we want the light to bleed. For this project, I made a spot on each cheek to simulate the blushing.


Then its time to install the LEDs. using only 1 LED looked a bit too dim for me so I used 2 LEDs and pointed them directly at the light bleed points. I only used blutack here for now since this current setup is temporary.

Once that's done we can close the 2 halves of the head together.


The effect really looks good specially since the kit is already colored pink. This would definitely look better if it would have a fade in/out effect and a proximity sensor that would activate whenever someone is approaching the kit.


Wednesday, November 23, 2016

[WIP] MG Phenex WIP 2

Just a short update here. So I've finally finished working on most of the MS. Mainly the limbs and some part of the waist area.


I did some fitting and lighting test to see how the kit would look like and I'm really pleased with the results. Though there are light spots in most areas, the armor parts would block and spread the spots more evenly.


I've also started putting on some of the armor parts and testing the transformation gimmick. Good thing everything works fine. Though some parts appear a bit brighter than the others, that's fine with  me.


Also put on the armor parts for the arms. I think that's the most you can close the armor parts.


Since this is a plated kit, It's going to be a fingerprint magnet. I'm going to have to use gloves whenever I want to display this after I'm done.


Since Bandai used white plastic for the base of the armor parts, nubs would appear really obvious here. And some nubs are really big which made it far worse. Unlike my MG Banshee Titanium Finish that was molded in black plastic, the nubs kind of blended easier since they already have the same shade and I didn't really have to do anything to fix it. In the MG Phenex, you really have to do something to fix these ugly nub marks. Maybe that's why they included that in the manual?


Another thing about this kit, despite it having so mach psychoframe parts molded in clear plastic, to think they left out 2 small pieces is unbelievable. I don't know why Bandai couldn't have easily included the eye and forehead pieces in the clear runners. So I'm going to try to recast these into clear pieces. Depending on how much time I have and materials available, I may try recasting these myself or have these commissioned.

Hopefully by the next update I'll have done more progress and maybe even finished the Armed Armor DE's.

Monday, November 21, 2016

[WIP] MG Phenex WIP 1

It's ironic that most of the thing we're not looking for are the ones that keep popping up.


I wasn't actually planning on getting another mg unicorn since I already have an MG Banshee Titanium Finish but when this popped up with a steal price, I didn't even hesitate of getting it. I thought that even if I didn't like the kit, I could still resell it and even earn a bit of extra.

Well, I decided on keeping it anyway. I thought it will look good with my banshee seeing as they have the same finish. Plus the blue pychoframe would look good lit up. Now I have more reason to get an MG Unicorn with the same finish.


Checking the manual, Bandai was kind enough to show us a way on dealing with the nubs. Unless we are able to do chrome plating ourselves, I think it's impossible to fix the nubs 100%. Here Bandai tells us to paint the nubs using Gold(100%), then Clear Yellow(100%) + a small amount of Clear Orange. I don't have those colors yet so I'm currently unable to test how well this looks with the plated parts.


Bandai used white plastic (1st image) for the armor parts unlike the MG Banshee Titanium (2nd and 3rd images) that has the parts molded in their respective colors. I'm hoping the white nubs wouldn't be as obvious since the Gold plating will produce a lot of reflection, hopefully blending with the nubs.


The MG Phenex inner frame and some armor parts for the backpack and feet area (1st and 2nd image) are molded in regular plastic unlike in the Titanium finish version (3rd and 4th image) which has all the armor parts in titanium finish and the inner frame parts molded in a metallic finish plastic.


At least Bandai was kind enough to pack each runner in its own plastic bag to prevent scratching the finish.

I've already worked on an MG unicorn frame before and I think I did a good job planning the wiring on that kit so I think I'll just be doing the same procedure here as I did with my MG Banshee Titanium Finish. I don't plan to document this as detailed as most of the procedure can be seen with the Banshee WIP. I'll still get pics as much as possible but I'll be highlighting more on those areas that I think I have improved on from the previous build.

I started working on the feet areas since those are one of the easiest parts.


Yes the pic is a bit too dark, I was trying to capture how the light would look in personal and this is as close as it gets to the actual part. Think of it as seeing that light but only on a regularly lit room.


The ankle parts require quite a lot of LEDs since it needs to light up 360 degrees of clear part. here I used 3528 and 0603 SMD LEDs. The thin magnet wire really helped keep the wirings neat.


I plan to keep the transformation gimmick so I can still display thin in either Unicorn or Destroy mode. The SMD LEDs and thin magnet wires really work well in going around the parts avoiding the moving pieces.


Working on the arms was the same with the MG Banshee. Though I think it's much cleaner this time.


I've had to sacrifice some articulation in the arms to give way for the joint to still be able to bend the whole way. Unfortunately, the slack for the elbow extension now prevents the arm from fully straightening. Only a minor issue for me since I still get a good amount of articulation.


Since the inner frame parts are molded in regular grey plastic, I decided to paint the inner frame pieces that will be exposed like the joints and other parts not covered by the gold plated armor. I'm using a custom gunmetal mix of polyurethane paint (commonly used in cars). I got this from a local car paint shop where the owner is also a gunpla builder. 

The progress on this post was done only on a weekend. I've been able to finish both arms and legs, and have started working on the waist section. Wherein my previous take on the MG unicorn frame, this amount of work would have taken a few days to even weeks. It really pays to having a well thought plan which makes execution a whole lot easier.


Welcome

Welcome to MechTalyer. My personal space for everything Gunpla.

Search

Popular Posts

Followers

Categories

1/100 (5) 100 (7) 144 (10) 2017 (4) air compressor (2) airbrush (6) amazing red warrior (2) anubis (1) avalanche (1) bandai (9) barbatos (1) base (5) blog (1) bsc (1) community (2) completed (1) conversion (2) custom (18) daban (3) decals (1) destiny (1) display (7) dragon momoko (10) event (1) exia (4) expo (2) flying base r (1) geirail (1) GMKC (2) guide (1) gundam (21) gunpla (24) gunpla builders den (2) haro (1) hazel custom (1) hg (8) hobby (11) IBO (1) jesta cannon (1) kamil (30) kotobukiya (1) led (38) led unit (1) magic toys (1) master grade (11) meetup (1) metal build (5) MG (25) mod (25) monoeye (1) nu (4) others (2) paint (7) pearl gloss (1) peg (1) phenex (4) philippines (4) qan[t] (2) random (7) review (15) RG (6) rx78 (2) setup (1) shia (2) sinanju (1) site (1) star build strike (2) stickers (1) strike freedom (8) tthongli (2) tutorial (6) unicorn (5) upgrade (1) vintage (2) wing expansion effect (1) wing zero custom (1) wip (36) zaku (2) zaku 2 (3)

Statistics

Powered by Blogger.